For salespeople, having a way to monitor deals — the potential sales in your pipeline — is a must. With Ontraport’s Deals and Companies features, paired with our Card View feature, you can use our pre-configured sales system or customize your own. These features enable you to visually keep track of deals within your sales stages, manually and automatically manage follow-up with each deal, forecast the value of your sales in progress, and more.
These features are available to Ontraport Plus accounts and above.
How Deals, Companies and Card View Work Together
Deal Records are created with sales teams in mind, and include essential fields such as Deal Value, Expected Win %, and automatically calculated Weighted Deal Value. They also include a primary contact for the deal and the associated company.
Companies Records include fields such as Industry and Annual Revenue, and they house all the deals and contacts associated with the company for optimal organization.
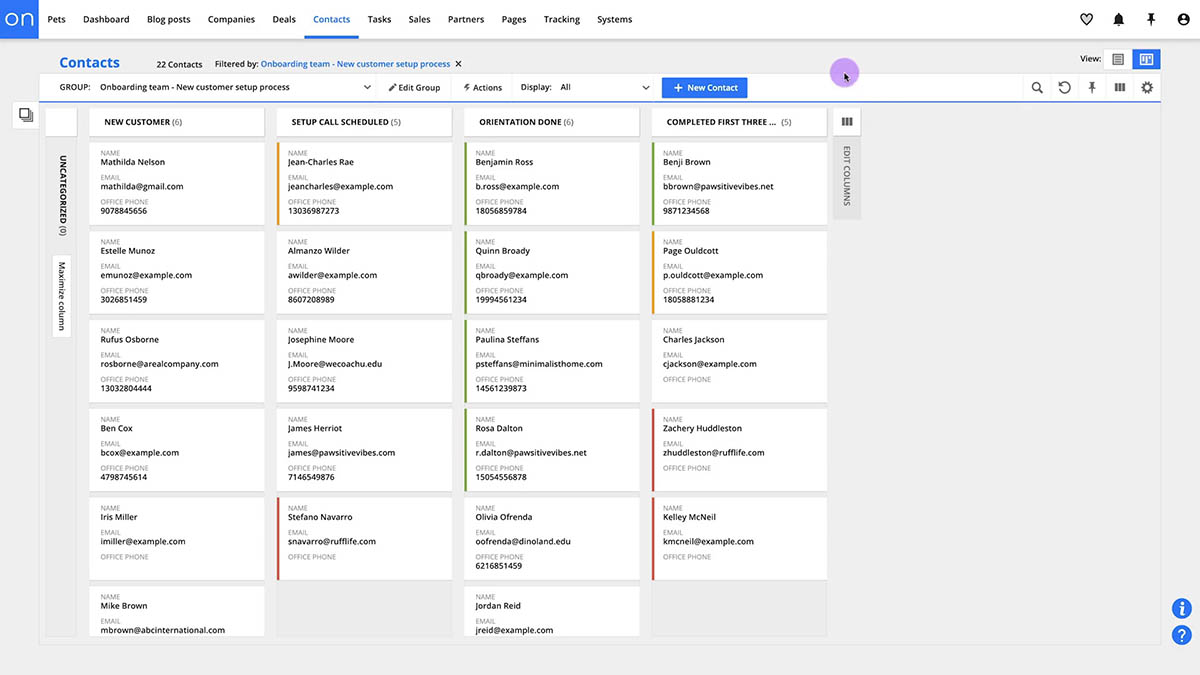
Card View allows you to view your records visually by sales stage. The feature comes pre-configured with stages representing a deal’s status as it progresses from New Prospect to Qualified lead to Closed (Won) and Closed (Lost) and beyond. These stage names can be edited or rearranged to match the terminology or steps for your sales team.
With group filters, sales reps and managers can also filter the Card View to show, for example, only deals won in the past seven days or only deals expected to close soon, to gain a bigger picture understanding of the status of their pipeline, forecast results for budgeting and resource planning, and uncover the team’s greatest opportunities to reach their goals.
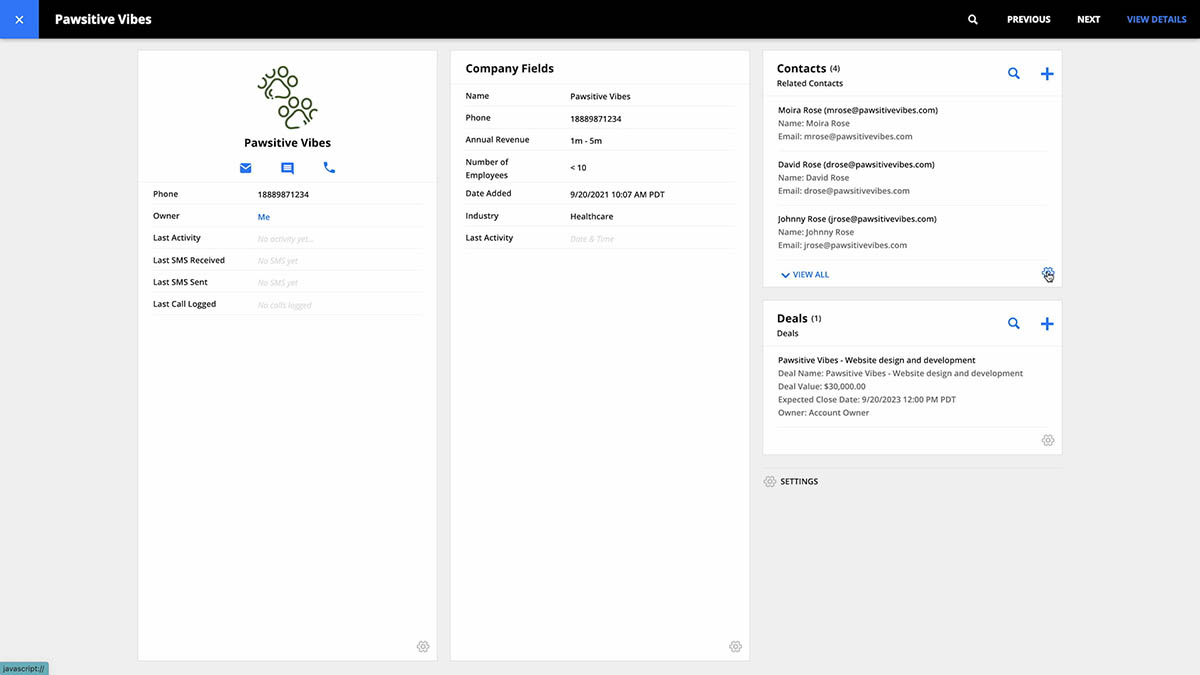
Object Quick View allows you to view your Deals and Companies records (and any custom object record in your account) without clicking away or loading another screen, making it ideal for managing one-on-one client interactions. You can view your most important client information and interaction history and send messages or log notes quickly and easily through Object Quick View.
You and your sales team can also create groups and choose which fields you want to see to support your workflow. For example, you can create a group of brand new deals that displays the “Deal Value” field so your reps can prioritize calling higher value deals.
Steps
To enable Deals and Companies in your account:
- Go to
.png) → Apps.
→ Apps. - Turn on both Deals and Companies by clicking
.png) .
. - Once you have enabled Deals and Companies, they will appear on your account navigation bar.
To create a Deal record:
- Create a deal manually by clicking Deals →
.png) on the top navigation bar.
on the top navigation bar. - Create a deal from a form submission by clicking Deals → Forms →>
.png) .
.
- Choose Ontraport Form or Smart Form, then add the “Deal Name” field and any other fields you want to the form.
To create a Company record:
- Create a company manually by clicking Companies →
.png) .
. - Create a company from a form submission by clicking Companies → Forms → .
- Choose Ontraport Form or Smart Form and add at least the “Deal Name” field to the form.
Add a contact to a Company:
- Manually add a single contact to a Company by clicking Contacts → the name of the contact you want to add → click into the company field and choose the desired company.
- Add multiple contacts by clicking Contacts →
.png) contacts you want to add →
contacts you want to add → .png) .
. - Click Select Field → Choose Company.
- Click Select Company → Choose the desired company name to update all selected contacts.
To create a Deal connected to a Company record:
Because Deals are connected to the Company that is interested in purchasing, and each Deal needs a point of contact, it’s useful to automatically connect all related records to each other. The best way to do this is through a form.
- Click Deals → Forms → .
- Choose your form type.
- Add the following fields: “Deal Name,” “Primary Contact → Email” (add the primary contact’s first and last name as well) and “Company → Name.”
When a form is submitted with Deal, Company and primary contact information, a record for each will be automatically created, and that information will also be added to the Deal record. The record will look like this:
.png)
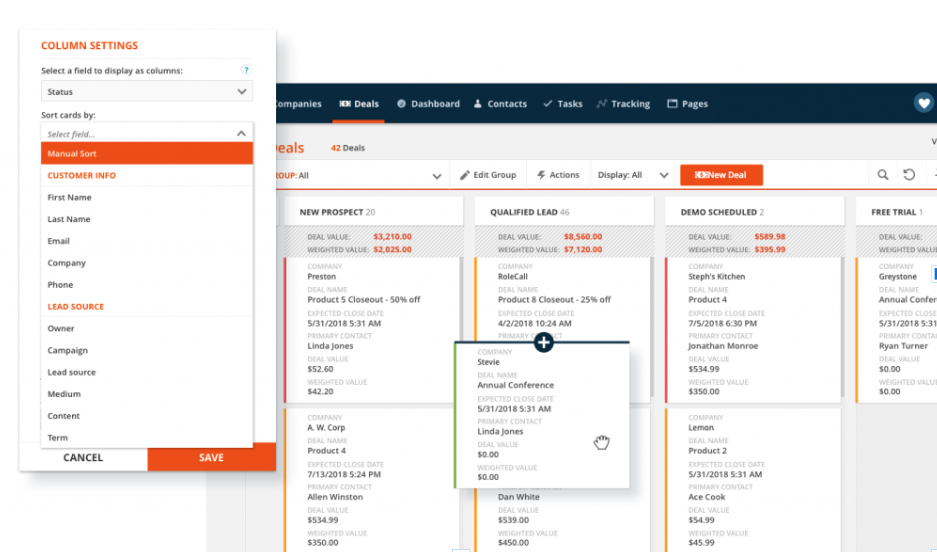
To view Deal and Company records as cards in Card View:
- Click on Deals or Companies in the main navigation, then click →
.png) .
. - Click
.png) for your Card View settings:
for your Card View settings: - Select a field to display as columns (you can select dropdown and color fields).
- Choose how to sort your cards by selecting from the “Sort Cards By” dropdown.
- Click Full Card or Mini Card to choose how much information is displayed — Mini Cards will display only three fields.
- Click
.png) to add fields to your card.
to add fields to your card. - Select a color field to show on the left of the card. These act as visual cues that help you quickly identify your hottest leads when managing your sales pipeline — “Recent Activity” is most common.
- Click Save.
- Click
.png) again to get back to List View.
again to get back to List View.
Manage Your Sales By Stage
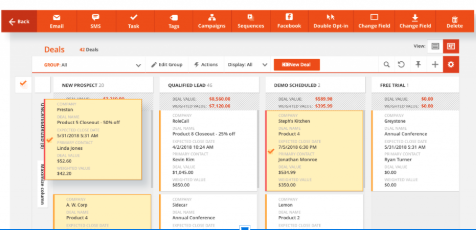
Once you’ve configured your cards and stages the way you’d like, you can interact with the cards using simple drag-and-drop functionality. Moving a card to a new column updates the related field in the record and can trigger any corresponding automation you’ve set up based on that field update.
You can also easily select certain contacts or groups of contacts and send them an email or SMS, add them to a specific automation map, or label them with a particular tag or field value using group actions.
About the Pre-set Framework
The stages of your pipeline shown in Card View, as well as the fields in deal records, are pre-set with the most common and essential fields for sales teams to make it fast and easy to get started, but these can all be customized if desired. We’ve also created all the typical automations sales teams use to keep their pipelines moving, such as calculations for expected deal timeframe and weighted deal value.
Here’s more information about the pre-configurations.
Automations
When Deals is activated, Ontraport automatically installs automations that run behind the scenes. The automation maps serve to continually update information in the default fields in Deal records, such as “Actual Close Date,” “Recent Activity,” and “Weighted Value.” Based on the updated information, the colors and other visual cues on your cards adjust.
The following automation maps were tailor-made to automatically update deal data as a deal’s criteria changes over time:
Calculate Weighted Value
Sales teams often use weighted deal value to forecast their expected revenue each month or year. This automation calculates this value based on the Deal Value and Expected Win % fields that are within each Deals card.
If you know that three out of every 10 proposals for $5,000 sales is won, then each of those sales will have a 30% probability of closing. So out of the 10 possible proposals, you can estimate that you will bring in $15,000. This means that you can see the forecasted expected win amount and estimate your revenue across all sales opportunities.
Update Expected Deal Timeframe
To give team members ongoing estimates of when a deal is expected to close, this automation continually updates the close timeframe as time passes.
Update Actual Close Date
This automation simply adds the Deal’s close date once it is moved to the Closed stage of the pipeline. This comes in handy when reviewing sales results and for reference in subsequent sales conversations.
Time Since Last Activity Color Field
This automation is designed to show team members which of their Deals are going cold and assigns a task to reach out to the inactive deal. This saves your team’s time by eliminating the need to check each record to find the deals that have not been active.
Set Deal Size Color Field
This automation assigns colors to cards that correspond with deal sizes so team members can quickly understand the monetary value of the deal. Color-coded cues allow reps to instantly zero in on the deals that are hottest, biggest or highest priority.
Check out the video about how to use color fields to learn more.
Use Case
You can use Deals and Companies for many business types and models. Here’s just one example.
- Let’s say you have a form where people can request a quote for your business. On this form are fields for Contact Name, Company, and a “Deal Name.” When that form is submitted, Ontraport will create a contact, company and the deal — with the relationships between the three records automatically set up. (Note: this form must be created under your Deals object.)
- In addition to creating the three records, the form submission will trigger your automation to update the deal’s field “Sales Stage” to equal “New Prospect.” Then, in Card View, you will be able to see this new quote request under the “New Prospect” column.
- After seeing a new deal appear in the “New Prospect” area of your Card View, you reach out to the primary contact on the deal. Based on this conversation, you might learn that this is a qualified lead, then drag the deal from the “New Prospect” column in your Card View to “Qualified Lead.” This will update the sales stage field in the deal record.
- Update the deal record with the expected value of this project and, knowing that in your company about 75% of deals similar to this deal are won, update the weighted deal value to 75%.
- Updating these values will kick off the Calculate Weighted Value automation map, which updates the field for “Weighted Value” based upon the expected win % and the deal value. You can add the weighted values across all deals in your account to forecast your expected revenue. This total number will display at the top of each sales stage column in Card View.
- The Card View for the field “Sales Stage” is useful for your sales team to monitor forecasted income and how many deals are at particular stages.
Check out these videos for more about Deals & Companies.