To truly provide individualized experiences for customers, you can send them down different paths within your automation map, depending on their actions and specific conditions. To do this, you’ll use filter elements such as conditions, splits and forks. You can also use filters to pause or halt your contacts’ journey down an automation map in order to keep them from progressing through the automation until they display further specific actions you require (e.g., purchasing a product, visiting a landing page, clicking a link in an email, etc.).
Here’s how to use the different filter elements to customize your contacts’ journeys.
Using filters in your automation maps
Filters change contacts’ path and how they move through your automation map. Filters can break the path into two separate paths, pause or end the path, or redirect the path, moving a contact from one element to another.
- To add a filter to a new or existing automation map, either click the + between elements where you want your filter to be, or click What Happens Next?
- Choose from these filter elements: Go To, Condition, End, Fork, Split, Wait. Goals are also filters, but they warrant their own article here.
Below are just some of many use cases for filter elements:
The Go To Element
When to use it: To redirect contacts from one element to another on your automation map
A Go To element can be used to move contacts throughout your automation by redirecting contacts to a different, non-sequential element somewhere else on your automation map. To connect a Go To to the desired element, simply grab the drag handle below the filter and connect it to the desired element.
.png)
A frequent use case for the Go To element occurs when there is a group of contacts that are already on a later email in an automation map and you want to drop new contacts into that group, not at the beginning of the map.
It’s important to note that a Go To cannot be connected to triggers or goals.
The Condition Element
When to use it: To separate contacts’ automation path based on whether or not they meet the criteria
The Condition element is used to separate a path into two different paths based on criteria you set. With a Condition element, unlike a Split element, the paths do not rejoin. Conditions are good to use if you have criteria, like a specific quality a contact must have, that determines how you want to communicate with the contact. This is best used if the condition being used will not change based on a contact’s action. For example, a pet store business might use a Condition to separate dog owners from non dog owners, taking them down two paths that give them content relative to whether or not they own a dog.
.png)
Conditions would not be a great option for criteria like, “Did the contact open the email?” Since the contact can open the email at any time, a Goal element would be better in this case. The Goal element would allow contacts to be moved to that automated path once they have opened the email, while the Condition would not allow them to receive the “opened email” content after they’ve already gone down the “didn’t open email” path.
The Fork Element
When to use it: To send contacts down two separate paths at the same time
In cases where you want to have two simultaneous, separate paths of actions, you can use a Fork element. The contacts on your autoamtion map all go down both legs of a Fork, so you can have them branch off to wait for an event using a goal, while continuing in the main automation map.
.png)
A Fork would be a great addition to your automation map if you want to communicate with contacts about two different things simultaneously. For example, you can add them to a automation path that sends out relevant content as well as another automation map that encourages them to buy.
The Split Element
When to use it: To split test automation paths
You can use Split elements to split test sections of your automation. The Split element will split a section of your path into separate paths that will eventually rejoin. These elements can help you test the wait time between email sends, different actions you want your contacts to take, or even different versions of an email or SMS message. The Split element also allows you to choose a custom weighting to the percentage of people you want to go down one path versus the other, such as 50/50 or 70/30.
.png)
The Wait Element
When to use it: To hold contacts on a place in your automation path for a set amount of time
To hold a contact in place along a path in your map, use a Wait element. Wait elements allow you to define how long to wait until the next action or process occurs on an automation path. For example, Wait elements can be used between email send actions to send the emails on the cadence you choose.

The Wait element can be set to hold the contacts forever, until some time passes (like the one pictured above), until a specific date arrives (such as a holiday), relative to a date field in the contact record (such as three days before the birthday field), or until a day of the week arrives (such as Monday).
Keep in mind these notes regarding Waits:
- Wait until some time passes: Each day is a full 24 hours. If the contact reaches the Wait element at 10:30 AM, and the Wait is configured to “Wait 1 day and then wait until 10 AM,” the Wait will pause the contact for a full 24 hours, until 10:30 AM the next day and then wait until 10 AM is next seen (the following day).
- Wait until a specific date: The Wait element will advance contacts only on the date specified. Contacts reaching the Wait element before the date will simply pause until that date arrives. Contacts arriving at the Wait element after the date has passed will be paused there forever.
- Wait until a specific date and time: The wait element will advance contacts only on, before, or after the date and time specified. For example, you can schedule an email to be sent hours or minutes before a date and time based on a contact’s field.
The End Element
When to use it: To stop contacts from continuing on an automation path
Adding an End element stops the contact on that path. You can choose to have the End element also remove the contact from the automation map they are on (shown as an exit element) by checking the checkbox to remove them. This action will not remove the contact from all paths on the automation map; it will just remove them from that individual path.
.png)
If you delete the End element to add more steps, the contacts will be removed from the automation map as well. If you know you will want to add new elements to the automation path later, use a Wait element set to “forever” before the End element. This will hold the contacts where they are and allow you to add new elements between the Wait and the End. Later, you can edit the Wait to hold them for a specific period of time. The contacts on the Wait will then flow to the next element.
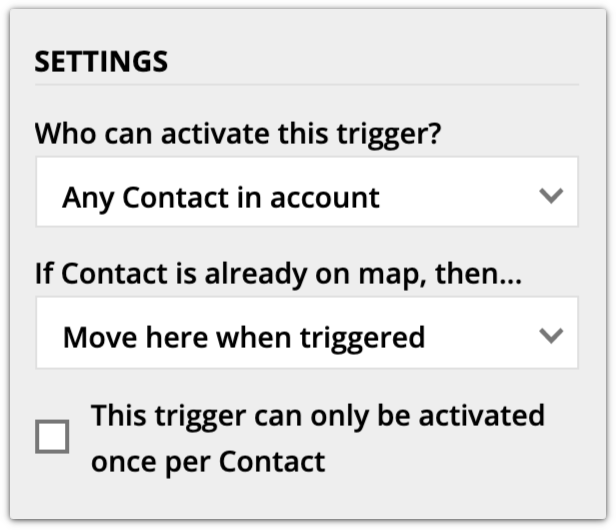
Tip #2: Using a trigger and a Go To element to remove contacts who are stuck on an End — If contacts get stuck on a automation element, you can add a trigger to the automation map which is set to activate when an arbitrary tag you create is given to the contacts (you can call the tag Moving Contacts Tool). Adjust the trigger settings to match the image below:
Below the trigger, add a Go To element which you will then connect to the element where you would like the contacts to be. Publish this updated version of the automation map, then click into Performance Mode. Locate the element where the contacts are stuck, and click on the number to show these contacts in a filtered group. Then, select all the contacts in the group, and manually apply the tag you based the trigger on. The contacts will be immediately moved up to the trigger and then sent where you need them to be via the Go To element. You can then manually remove the tag from the contacts, and they will remain on the element you sent them to. Keep this trigger in your autoamtion map to use as a tool to relocate contacts whenever the need arises.
Tip #3: You can copy the rules on your condition elements to quickly add multiple similar conditions. Hover over the condition you want to copy, then click  .
.
Your copied condition will appear under your original where you can customize it to fit your needs.
